Welcome to our first post in the series – 12 Days of Stocking Stuffers! Remember to follow us and add your comments/tips for the giveaways.

Now, to the main event: cloth napkins, tablecloth, and a bonus – easy napkin rings! The cloth napkins and tablecloth are both made using similar techniques either a rolled hem with a serger or hemmed edges with mitered corners using a standard sewing machine.
Skill Level: Easy
Time: Quick – 1 to 2 hours (not including time to prewash fabric)
Materials
- 2 yards of 43″ wide light weight cotton or washable linen will yield 36 – 8″ square cocktail napkins, 8 – 15″ dinner napkins, or 1 table cloth. I used a 53″ washable tissue linen (linen/cotton blend) for both my dinner napkins and table cloth. The wider fabric was needed for width of my table. Use light weight fabric for the serger rolled hem technique, but heavier fabric is ok for the standard sewing machine technique. I recommend machine washable fabrics for both the napkins and tablecloths.
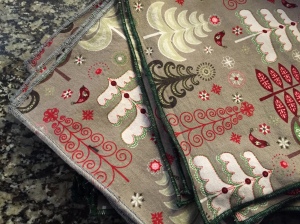
- Matching or contrasting thread depending on the look you are going for. I did the cocktail napkins with both gray and green thread to show how much a bright (green) thread made the pattern on the napkins pop.
- Fray check (for serger technique)

Serger Technique: Rolled Hem
- Prewash fabric and trim excess threads that may have unraveled during washing. I also recommend doing a quick all-over ironing of the fabric to press out any kinks as it will make the cutting step easier and more precise.

- Measure & Cut:
- For 8″ square cocktail napkins, cut 8½” squares which allows ¼” allowance on each each for the rolled hem. For 15″ square dinner napkins, cut 15 ½” squares.
- Tablecloth size depends on the size of your table, but aim for a 2-3″ overhang on each edge and add ¼” allowance to each edge for the hem. My table is 36″ x 60″ rectangle and I wanted 3″ overhang. So, my table cloth unfinished was 42½” x 66½”.
- A rotary mat, rotary cutter, and acrylic ruler make this process much easier.
- Sewing – Rolled hemming is done by rolling and overedging the fabric (the serger does this for you).
- Machine set up (my serger is a Singer Profinish):
- Remove the left needle
- Flip up cutting blade
- Move seam width finder knob to setting R
- Align left face of seam width finger support plate to R
- Set stitch length dial to “F”
- Remove the thread from the leftmost spool (this is a 3-thread rolled hem, so only 3 spools are needed)
- Sew the edge of a practice piece of napkin or table cloth fabric to ensure it looks the way you want it to.
- When all your settings are right, make a note of your thread tensions and serge around the edges of your
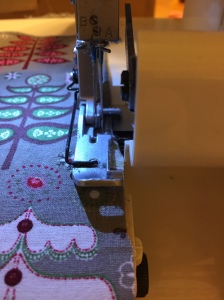 napkins (you may need to adjust the setting slightly if you are using different fabric or thread for the table cloth). Line the right edge of your fabric up against the edge of your machine so there is about a ¼” allowance that gets “rolled” into the hem by the machine. Use your left hand to guide the fabric through the machine – this is especially important as you start each edge and will help the thread not to bunch up too much.
 - Do not trim the tails of the thread t
 oo close or they will unravel (this isn’t like a standard sewing machine where you can lock your thread before cutting).
- Machine set up (my serger is a Singer Profinish):
- Apply fray check & trim tails – apply a dab of fray check to each corner and let it dry before trimming the thread tails.
- Common problems:
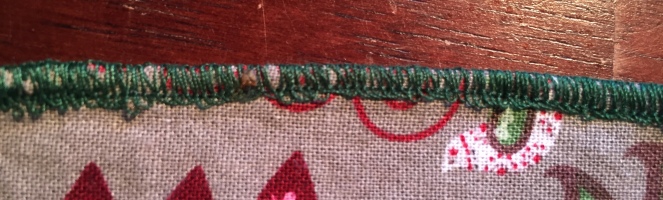
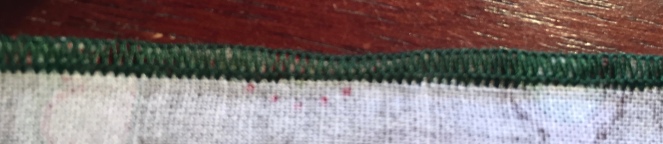
- Don’t be Lazy – Seriously, these are so quick to make but take the time needed to measure accurately, cut straight, and sew straight. This will make a big difference with your finished product. Additionally, ensuring you trim all frayed edges before sewing will help you avoid this:
 Frayed edge left untrimmed
 Frayed edge with rolled hem stitch
 - Follow the instructions for your machine – every serger is a little different but the instructions for sewing a rolled hem for my serger said to remove the left needle. I thought, well this is so that this needle doesn’t make a little hole in the fabric. I figured it I just removed the thread from this needle, it would be fine to leave the needle in… this lead to an hour or more of frustration in trying to resolve what I misdiagnosed as thread tension issues (more on actual tension issues below). It turns out you DO need to remove the left needle or it creates a little unnecessary loop on the inside edge of your rolled hem.
Failure to remove left needle creates little loops on bottom edge

Rolled hem with correct settings (and left needle removed) - Tension – If you are new to sergers (like me) this is a great project to practice tension adjustments because there are only 3 threads instead of 4 and the rest of the project is pretty straight forward and simple. Getting the tension right has caused me a fair amount of agony, but I will say that the finished product looks great and is easy to create once you get
 things set up… so if you need adjustments, stick with it trying to reason through the problem OR just trial and error until you get it right. I found the book Sewing with an Overlock: Singer Sewing Reference Library to be monumentally helpful in figuring out my tension problems. It has lots of colored pictures to help you see where you need to make adjustments.
- Don’t be Lazy – Seriously, these are so quick to make but take the time needed to measure accurately, cut straight, and sew straight. This will make a big difference with your finished product. Additionally, ensuring you trim all frayed edges before sewing will help you avoid this:


Sewing Machine Technique: Hemmed Edges with Mitered Corners
The CraftyStylish blog does a fantastic job at explaining and showing how to make napkins with hemmed edges and mitered corners. Tablecloths can easily be made using the same technique. I will just add a few notes below.
- Prewash fabric and trim excess threads that may have unraveled during washing. I also recommend doing a quick all-over ironing of the fabric to press out any kinks as it will make the cutting step easier and more precise.
- Measure and Cut: the author of the CraftyStylish blog recommends 9×9″ square cocktail napkins and 21×21″ square dinner napkins. I like mine slightly smaller (8×8″ cocktail and 15×15″ dinner) – it is all a matter of preference though. Just add an extra inch to each edge for hemming.
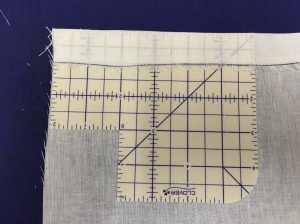 A Clover Press Perfect Hot Hemmer, makes ironing them hem much easier and faster. In step #3 under “cut accurately” the author recommends ironing a 1″ hem and then turning in the raw edge 1/4″. I found it faster to do it in reverse – turn 1/4″ raw edge in first, then fold another 3/4″.
- It was much more efficient to do each step for all the napkins before moving to the next step (instead of one napkin start to finish). So, for example, I cut all the napkins, then ironed all the napkins, mitered all the corners, then sewed all the edges.
- When you are sewing the hem in place (step #8 on the CraftyStylish blog) sew as close to the edge as possible. In practice, most of my edges were about 1/16 to 1/8″ from the edge, but it looks best to have the stitching just on the edge.


Easy Napkin Rings
Here is a way to make some quick (and cheap) napkin rings for a gift or your own holiday table:
Materials: Makes 6 napkin rings 
- 1 cardboard paper towel roll
- 1 Yard of wide ribbon – I used 1½” green velvet ribbon. Alternatively, you could also use fabric if that is what you have on hand.
- Craft Glue
1. Cut the cardboard paper towel roll into rings that are the same width as your ribbon. Cut the ribbon into 6″ pieces. (If you are using fabric, cut them into strips 6″ long and slightly wider than the cardboard rings so that you can tuck the edges into the roll.)
2. Apply craft glue to the back of the ribbon or fabric
3. Press the ribbon or fabric around the cardboard ring and let sit an hour or two to dry!


My mom made a fabric covered cardboard roll as a toy for Elise, but the same technique would be used for the napkin rings (just cutting the roll into 1 ½” pieces).


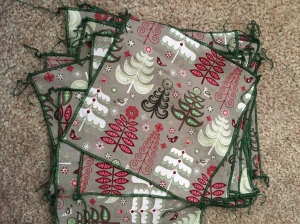
Here is the finished holiday table. The cocktail napkins are a holiday print and pair nicely with Cowgirl Creamery Mt Tam Cheese and Lesley Stowe’s Raincoast Crisps Fig and Olive Crackers (if you are looking for a little something extra to add to your gift). The dinner napkins and table cloth could easily be used year round with different napkin rings.


– Sarah

I want a serger…NOW! Mine was stored in a garage during the 2011 flood, got moisture in the gears and locked up forever. I had to say goodbye to my trusted Pfaff of nearly 30 years. Thank you for this wonderful post of inspiration!
LikeLiked by 1 person
The cocktail napkins are a great idea. A friend gave me 24 hand made ones years ago, all rolled and tucked into a little basket! A fun way to display them for a party.
LikeLiked by 1 person